Clients
The main dashboard screen provides an overview of your clients. This section explains the features and functionalities available in the Clients Overview.
Home screen
Location: Top bar → Clients
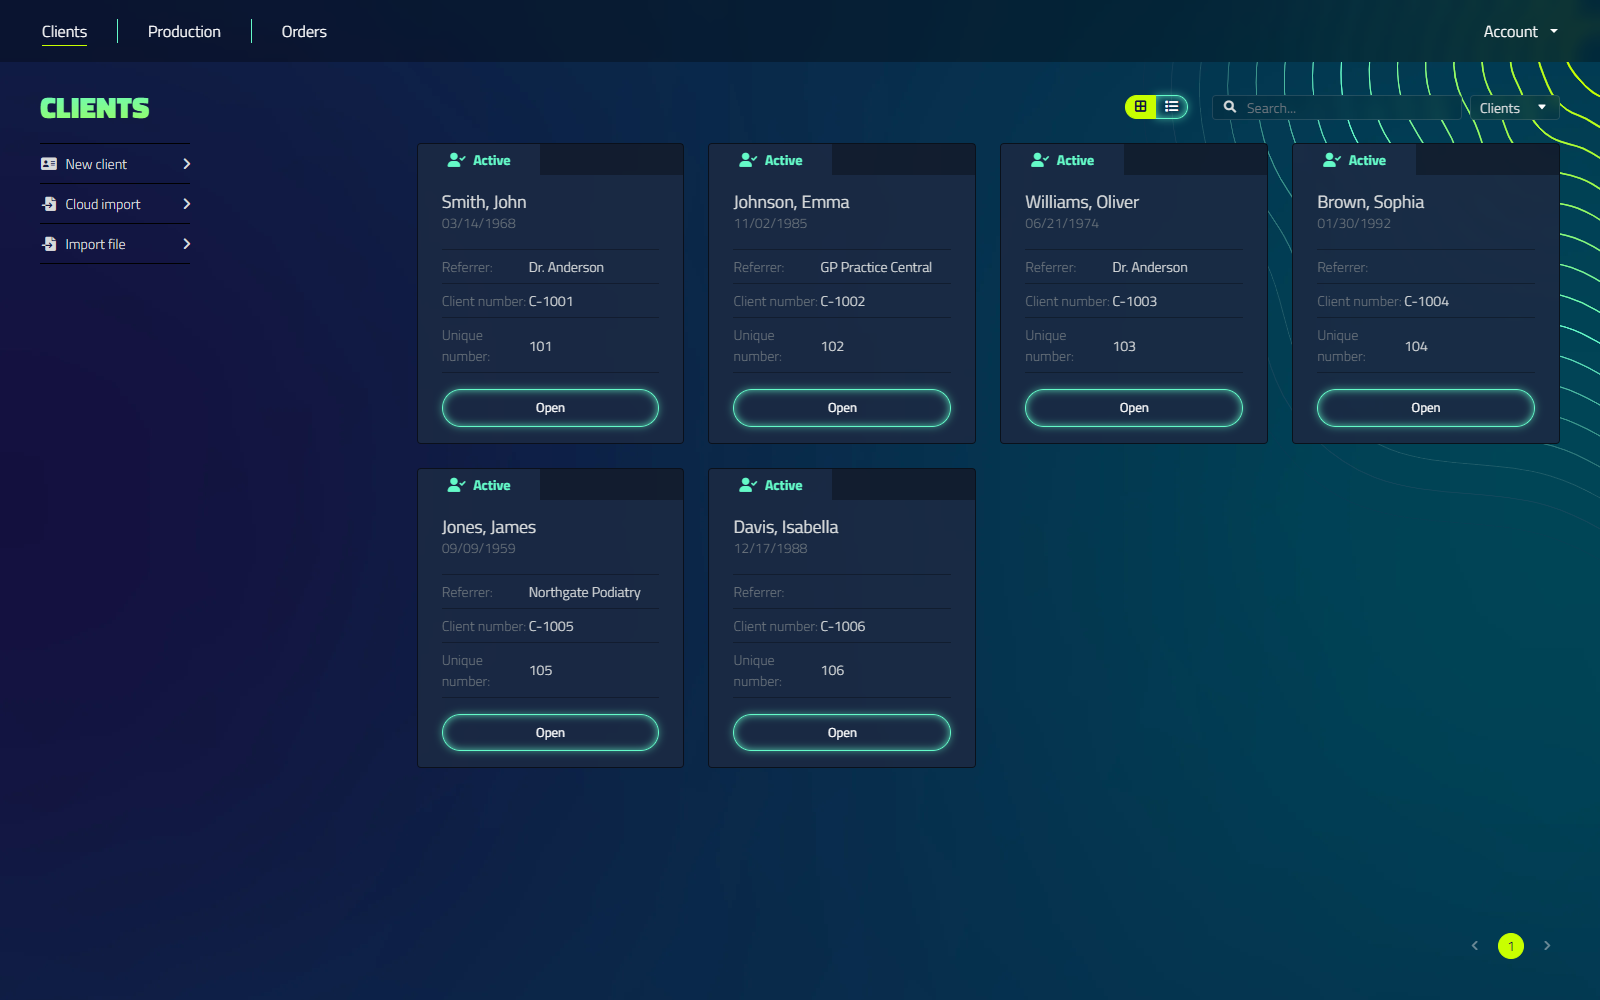
The client home screen has a sidebar of action buttons on the left (New client, Cloud import, Import file) and the client list on the right, with search and the Grid/List toggle below it.
Layout Options
You can customize the view of your clients by switching between two display options:
- Grid Layout
- List Layout
Choose the layout that best suits your preferences and workflow. Your choice is remembered between sessions.

Search Functionality
Use the search feature to quickly locate specific clients or projects.
The search bar allows you to easily find your designs by searching for:
- Clients (name, client number)
- Project titles
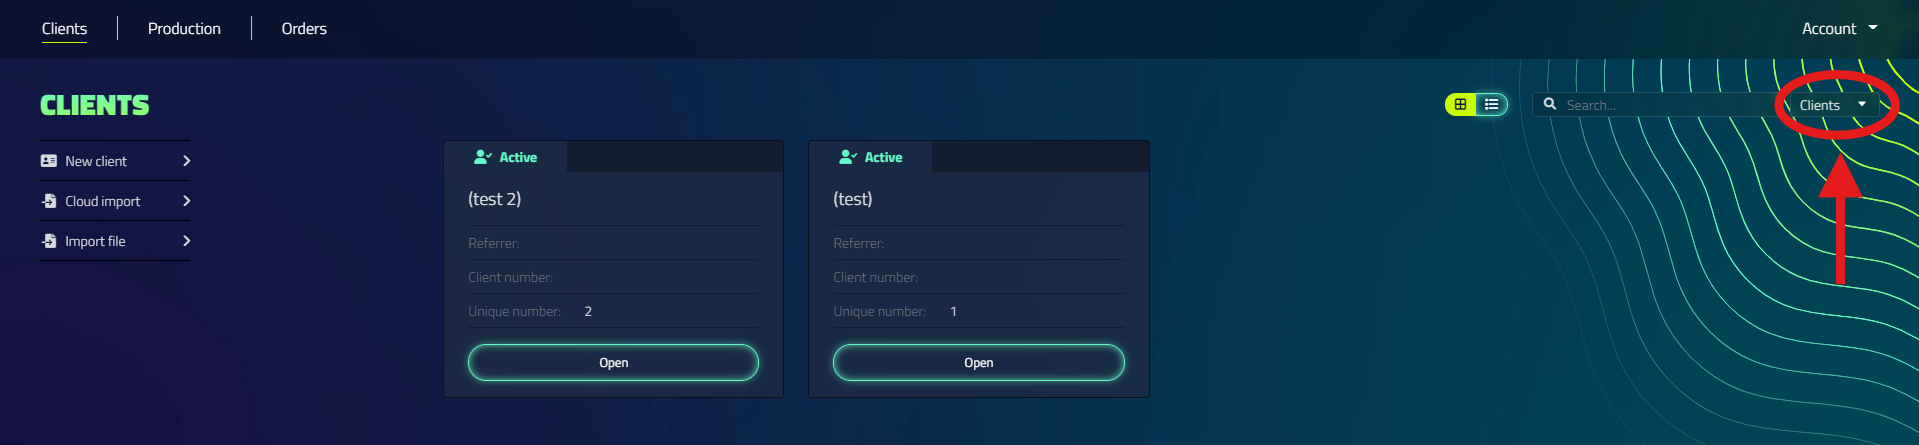
A dropdown next to the search field switches what you're searching:
| Option | Searches |
|---|---|
| Clients | Client name or client number |
| Projects | Project name |

Client list columns
The list view shows these columns:
| Column | Description |
|---|---|
| # | Internal client ID |
| Name | Client's full name, click to open the client page |
| Date of birth | |
| Referrer | Referring physician or institution |
| Client number | Your own reference number for the client |
| Status | Active / Inactive |
| Open | Opens the client page |
Project search results
When you switch the search dropdown to Projects, the results table shows project columns instead of client columns:
| Column | Description |
|---|---|
| # | Internal project ID |
| Name | The client's name, click to open the client page |
| Project | Project name, click to open the project |
| Created on | Date and time the project was created |
| By | Who created the project |
| Status | Unknown / Active / Archived / In production / Ordered |
| Open | Opens the project |
Some column headers are shorter than the content they hold. The client-name column is just labelled Name, and the creator column is labelled By.
Importing clients
Besides adding clients one at a time, the home screen offers bulk options:
| Button | Function |
|---|---|
| Cloud import | Opens the cloud import dialog |
| Import file | Import client data from a .csv or .json file |
Client Management
You can manage your clients through the following actions:
- Adding new clients
- Editing existing client information
- Deleting clients
Client Stages
Clients are assigned different stages based on the production status of their designs:
- Active: When a new design is created for a client
- Inactive: When designs are produced and no active action is required from the designer
The client stage automatically updates as the production status changes.
Client View Settings
You can adjust the amount of client information displayed by changing the "Client view" setting in the Settings.
To modify the client view:
- Open Settings from the account dropdown at the top right
- Locate the "Client view" option in the "Basic" tab
- Choose between:
- Compact: Displays basic information (Name, Date of Birth, Client number, and Notes)
- Extensive: Allows you to enter more detailed client information

Switching between view modes may affect the visibility of certain client details.
Creating a client
Location: Home screen → New client
No field is required. You can save a client with any subset of fields filled in. A name or client number is usually enough to find them again later.
Which fields you see is controlled by the Client view setting (Compact / Extensive) in Settings → General. See Client View Settings above. There is no separate toggle on the form itself.
Compact view
| Field | Notes |
|---|---|
| First name | |
| Last name | |
| Date of birth | |
| Client number | |
| Notes |
Buttons: Cancel (returns to the home screen) and Add (creates the client).
Extensive view
The extensive view adds two further sections.
Client info
| Field | Notes |
|---|---|
| First name | |
| Insertion | Middle name / name particle (e.g. "van", "de") |
| Last name | |
| Sex | Unknown / Male / Female |
| Prefix | Name prefix or title |
| Initials | |
| Date of birth | |
| Fiscal Code | Citizen service number (BSN) |
| ID Type | Unknown / Passport / ID card / Drivers license / Aliens Document |
| ID number | |
| Client number | |
| Health insurance number | |
| Health insurer | |
| Referrer | |
| Notes |
Address and contact details
| Field | Notes |
|---|---|
| Street name | |
| House number + addition | |
| Postal Code | |
| City | |
| Country | Dropdown, all countries |
| E-mail address | |
| Phone number |
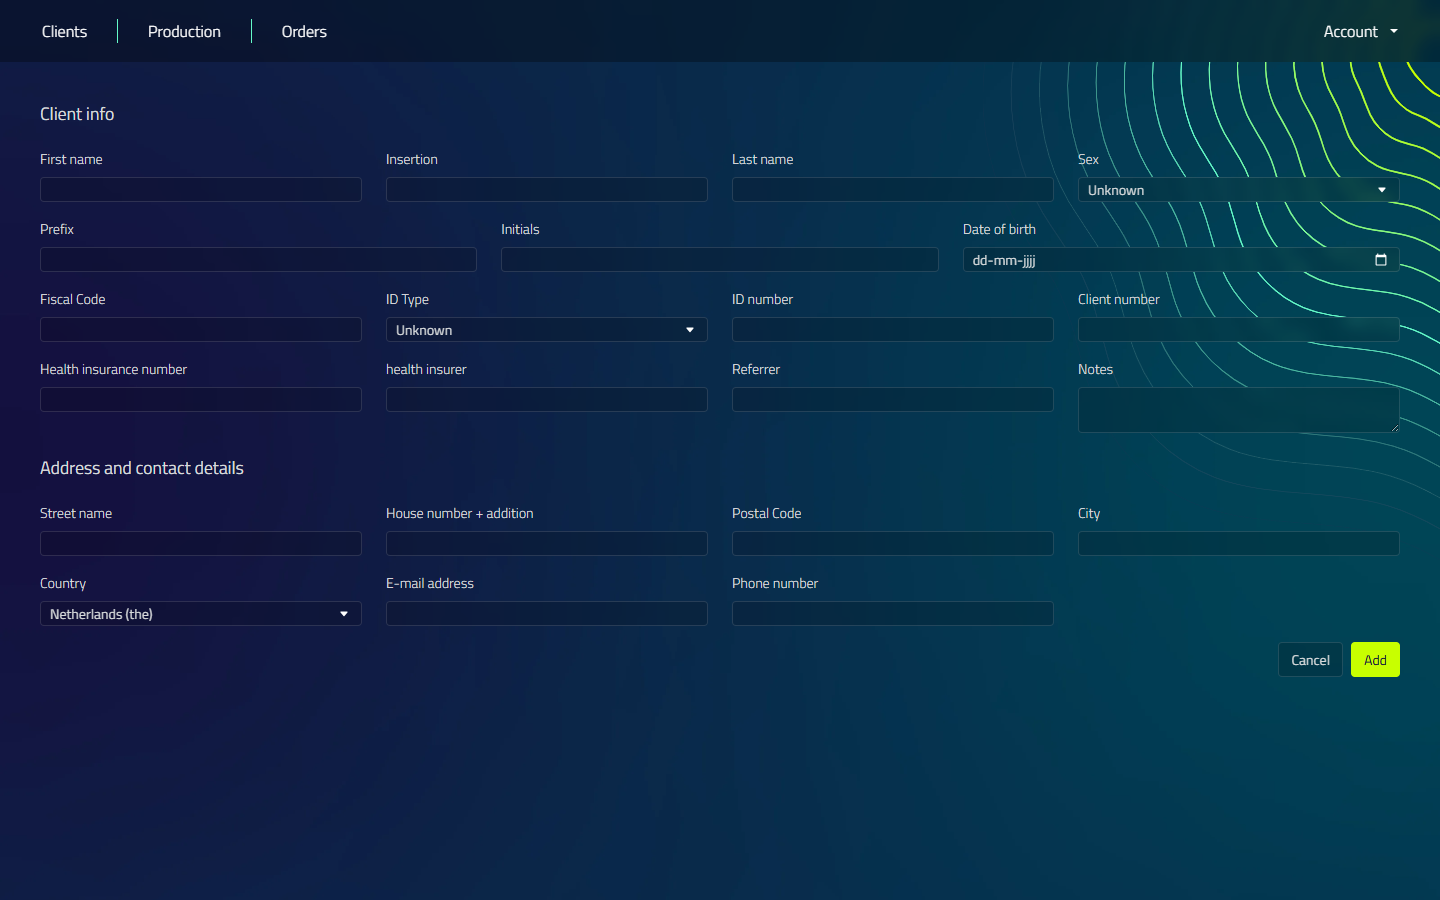
Buttons: Cancel and Add.
The client page
Location: Home screen → Open
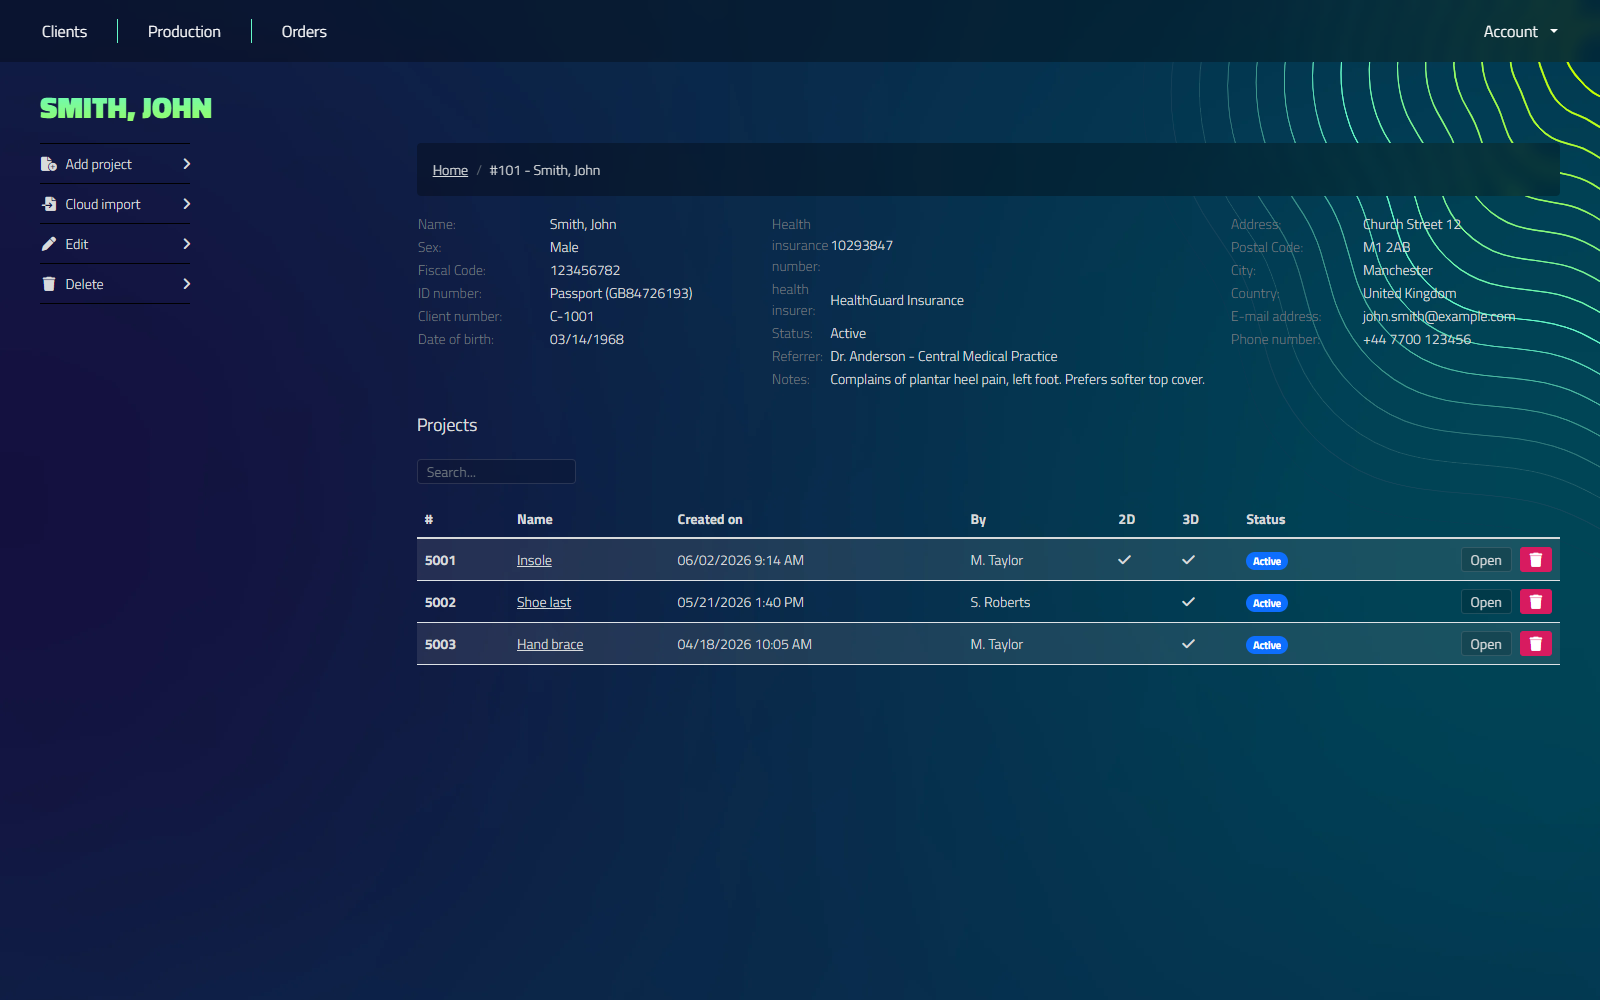
What the top of the client page shows depends on the Client view setting:
| View | Fields shown |
|---|---|
| Compact | Name, Client number, Date of birth, Status and Notes |
| Extensive | Name, Sex, Fiscal Code, ID info, Client number, Date of birth, health insurance fields, Status, Referrer, Notes, plus address, e-mail address and phone number |
| Button | Function |
|---|---|
| Edit (pencil icon) | Opens the client edit form |
| Delete (trash icon) | Deletes the client |
Deleting a client is permanent. It removes all of that client's projects and documents too. A confirmation is shown first ("Are you sure you want to delete this client?").
Projects section
The client page lists that client's projects, with its own search field.
| Button | Function |
|---|---|
| Add project | Creates a new project for this client |
| Cloud import | Opens the cloud import dialog, scoped to this client |
Importing a .cad file happens from inside a project, not from the client page. Open or create the project first, then use its Import file option there.
Projects table columns
| Column | Description |
|---|---|
| # | Project ID |
| Name | Project name, click to open |
| Created on | Date and time created |
| By | Who created the project |
| 2D | Checkmark if the project already has a 2D scan document |
| 3D | Checkmark if the project already has a 3D scan document |
| Status | Unknown / Active / Archived / In production / Ordered |
| Open | Opens the project |
| Trash icon | Deletes the project, asks for confirmation; permanent |